A small change can really make a big change! In this series I will present changes I have made or am currently implementing. These changes make a huge difference in your life and your family’s life. Please leave a comment with your thoughts about this change. What are some big or little changes you are making that you want to share? For other “simple changes” visit the simple changes page here.
 The best flour is fresh. What isn’t best when fresh? Fresh baked bread, fresh-baked cookies, fresh out of the dryer sheets, fresh picked fruit and veggies, fresh air! Freshly ground flour has the many nutrients that flour has to offer. You unlock it before your very eyes and get to “harvest” that freshness for use in your freshly baked goods! Just like fresh picked fruits and veggies, the longer they are off the vine (or the longer the flour has been “unlocked”) the more nutrients disappear. How long has the flour been sitting on the store shelves?
No, you do not have to force every bit of food you eat to give you the most nutrients. There are other ways to unlock nutrients. You can use the soaking method or the sourdough method to work with the flour you have to give you really great healthy nutritional bread…but I for one want the food I consume to have as many nutrients as possible. I also want it to be AFFORDABLE. Is grinding your own flour affordable? YES it is. Is there an upfront cost? YES there is. {I won’t delve into the specific costs of every aspect of grinding because there are too many variables and prices are different due to the region you live in.}
Here is my grinding example: I was buying bread, Rudi’s Organic to be specific. For one, there are too many ingredients. I like supporting Colorado businesses (where I am from, not where I currently reside), however, I found this is not the best bread for my family – though the bread is so fabulous and I do love it. I was paying $3.00 a loaf. That is not expensive for bread and it was organic so it really was not a bad deal. However, in keeping with REAL food, there were too many ingredients and I needed another option. Enter – buying whole wheat berries! This is such a cheap alternative. It also allows me to use spelt, buckwheat, rye, soft white wheat, soft red wheat, hard white wheat, hard red, and so on. Buy wheat berries in bulk, grind yourself and voila! You can have a loaf of bread for closer to $0.50 per loaf. Yes, that is right, about a $2.50 per loaf savings (assuming you are able to find good bread as cheap as I can – I live on a military base where everything is cheap!). Not only that but you have opened yourself to the world of sprouting.
Many recipes call for soaking your flour. This is the process of using a liquid plus an acid (or some believe just warm water will suffice, this is completely up to the individual baker) and soaking the grains (the ground grains) for 7 hours to overnight. However, some recipes do not have the amount of liquid in the ingredients to make soaking possible…so you can sprout! Sprouting your flour breaks down the bad enzymes much like soaking does, but without the addition of liquid. To sprout you soak the berries overnight, and then you rinse them well over the course of a few days until they get a “tail” and you then dry them out and then…you guessed it…you pass them through a grain mill and have freshly ground sprouted flour. Now you can cook with healthy nutritious flour without needing to soak or use sourdough. {For more information on sprouting and soaking I highly recommend checking out the GNOWFGLINS ecourses -very informative and helpful – I am currently enrolled and love them}.
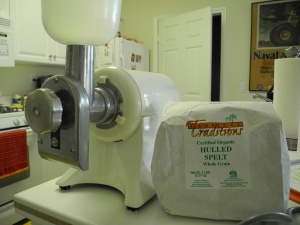
Several options for baking. Unlocking nutrients and utilizing them at their best. Saving money. Wow, this sounds like something I couldn’t pass up! And, I didn’t. We found a Champion Juicer (used on eBay) and the grain mill attachment (new on eBay) for a total of $150.00 (including shipping). For an electric grain mill this price is pretty awesome. Here is the math behind my justification:
Variables:
Store bought 2 loaves of bread per week @ 3.00 per loaf = $6.00 (A)
Champion Juicer plus grain mill attachment = $150.00 (B)
Wheat Berries @ 25 lbs for $20.00 = 100 cups of flour @ $.20 per cup (C)
Average loaf of bread is 2.5 -3 cups per loaf x (C) = $.60 per loaf (D)
Homemade bread 2 loaves per week = (D) x 2 loaves/week = $1.20 (E)
How I use those variables:
(A) – (E) = $4.80 {per week savings by making my own bread}
(B)/$4.80 = 31.25 {number of weeks to “break even” on grain mill}
In under 8 months I will recover the cost of buying a grain mill. This is assuming I only make 2 loaves per week, and I must say, homemade bread does not last that long! I get the option of sprouting my flour. I get more nutritious flour and the grain mills last for years and years (mine is from the 60’s!) so it is a good investment and you get to control when your flour was “unlocked”!
 The grain mill (flour grinder, grain grinder, whatever you may call it) is heavy, clunky and you probably don’t want it out on your counter. So here is how I manage to get the best out of my grinder with out grinding flour EVERY TIME I need it…Grind your flour once a month and freeze it. Freezing locks in the nutrients for about a month. It may take you time to figure out how much you need, so for a little while there will be a learning curve. I use approximately 2 gallon sized ziplock bags of flour per month plus some if I do more pancakes/muffins, etc. So at a minimum I do a gallon ziplock bag of ground spelt and a gallon ziplock bag of ground soft white flour. I grind the flour directly into the bag so it minimizes the amount of dust and it keeps me from cleaning a bowl. Mark the type of flour and the date. Get this – “frozen” flour does not need to be brought to room temperature. It doesn’t get stuck together. You can literally use a measuring cup and measure your flour for the recipe right out of the ziplock bag. That is even easier than trying to not make a mess when dealing with a store-bought flour bag or canister that is too small for the measuring cup. Another plus for grinding your own!
So there you have it…my grinding flour routine and why I decided to spring for the upfront costs. Use the formula I have created above (I am an accountant so please in the comments below let me know if this is at all confusing) to plug-in your own variables and you can customize your savings!
Do you have a grain mill? How often do you use it? What one do you use and do you like it? Share!


